Home | Scratch Index
Getting Started
Congratulations on getting started with Scratch. Scratch is a block based online coding language that easily allows you to create all sorts of fun programs with code blocks. Code blocks are great for beginners because you are able to drag and drop different code blocks and link them together without ever having to worry about syntax rules. You’ll have all the advantages of learning different programming concepts without the frustration of having to worry about the correct way to type out a specific piece of code. You’ll just drag, drop, and connect. Okay, maybe I over simplify a bit, but its not too far off though.
I’m going to guess that if you’re here, you already have a Scratch account and are ready to create your first project. To do that, click on the “Create” button in the type menu bar.

The Online Editor

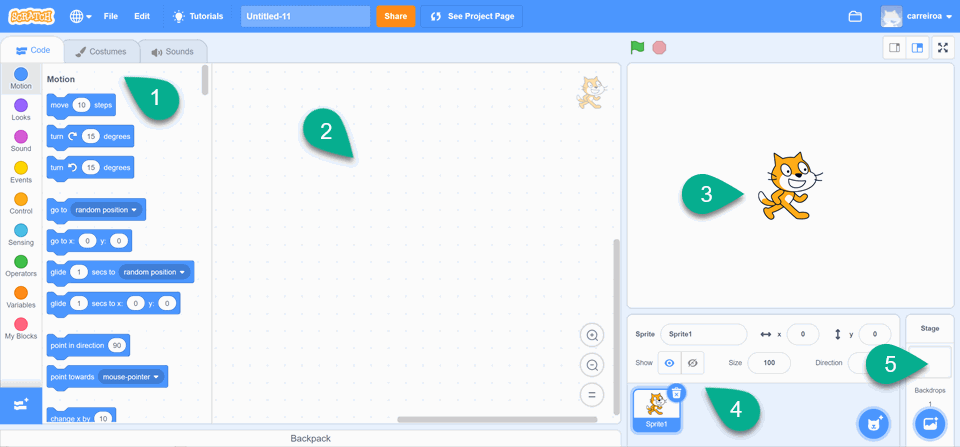
Here we have the Scratch online editor and its different areas.
-
This is the pallet where you can flip through the tabs, code, costume, and sounds. Each one opens up to their related area.
-
Code: On this tab we have our various code blocks that we can drag out onto the scripting editor (2). They are conveniently colour coded into different categories like Motion and Looks to make it easier for you to differentiate between them while coding. Just click on the legend to find the block you need our scroll through the list.
-
Costume: Click on this tab to customize how your sprite looks (4). You can change its colour, draw different costumes, whatever you like.
-
Sounds: Here you can select a sound associated with your Sprite or even create your own.
-
Note: I would be remiss if I didn’t mention that the Costume tab will change into Backdrops if you click off of the Sprite and select the Stage (5). Under that tab you can create different backdrops or scenes for you program.
-
-
This is the script editor where we will place our code for our selected sprite or backdrop. To know which sprite or backdrop you are currently coding for, you will notice a slightly opaque thumbnail of the object in the top right corner of the script editor.
-
Here we have the Stage. Just like the theatre, this is where we can see our code in action when we run it.
-
This is your sprite pallet. You can rename, resize, locate, hide, show, and point your sprite in a specific direction. You can also add more sprites to this pallet by clicking on the Choose a Sprite button at the bottom right of the pallet. Hovering over this button gives you a whole host of options for adding something that you will like.
-
The stage pallet is where you can select your stage for editing or create a new one. Much like the Choose a Sprite button the Choose a Backdrop button provides you with the same options.
The Menu

The menu is fairly self explanatory but worth a few lines here. From left to right we have first a globe button that gives us the option to select our language of choice and then the File dropdown. In this dropdown you have many options that you would expect including a Load from your computer selection. Scratch does have an offline editor for you to download, and if you’re using a Windows machine you can find it in the Windows Store. This can be handy if you’re coding in places where your internet connection may be a little spotty or non-existent. The Edit dropdown gives you the option to undo your last edit along with something called Turbo Mode. Turbo mode simply turns the focus of Scratch processing away from the stage to more arithmetic operations that can help speed up the processing of your program if it’s heavy with calculation. For the most part, you won’t select this too often.
The tutorials button takes you to a page where you are presented with some pretty nifty and handy content to help you get started on your Scratch coding career. To the right of that you have a dialogue box that allows you to change the name of the current program you are editing. And beside that we have the Share button.
The Share button is an important one and requires setup for you to be able to use. You will only be able to share your code with others if you have verified your Scratch account. So if you want your close family and friends, perhaps even the world to see your coding awesomeness, you’ll have to verify your email address.
The project page button brings you and your guests to your programs homepage of sorts.
On the far right you have a file folder that you can select to see all of your projects and your account profile where you can make any user changes that you need to.